Showing posts with label Federigo. Show all posts

Monday, 6 September 2010

Federigo Mission : Vergo the Cursed

Mission Information
Participation : Solo
Character Lineup : Master Grace - Shotgun Blaster, Expert Soho The Wind - Arnis + Enhanced Tactics, Expert Musketeer - Outrage Shot.
Requirements : Platinum Hammer (Silver Hammer x1, White Gold Bar x1), Vergo the Cursed Lobby Key (Family Reputation x300, Pure Talt x500)
Rewards : Elite 84 items, Level 100 items, 1 Constellation Indication (rare)
Frequency : daily
Duration : 120 minutes time limit. Average time of  5 minutes to complete mission.
Difficulty : Easy

A fairly easy solo-able instanced mission is Vergo the Cursed. It is the easiest of all Federigo Raids and can be done daily. The simplicity of the raid and its low level of difficulty has pushed the price of Silver Hammers in Rembrandt server since most families with decent equips and veteran or expert characters can complete the raid.

For this raid, I use the same "shooter" team that I complete Mission : Rafflesia with. Casting Principal and Hound once are usually enough to kill Vergo.


Usual buffs for Mission : Vergo

To start the mission, proceed to I4 of Porto Bello's Desolated Cliff. Surrender the platinum hammer to the tombstone and proceed to the gate that appears and use the corresponding key. Once inside, buff up and proceed to G/H 5 where Vergo will be waiting.

Vergo is in the middle of the map.

He is susceptible to range attackers and daggers, which should prove no problem to team. Though he is human, there is no need for human bane weapons. This mission can be accomplished with trump weapons.
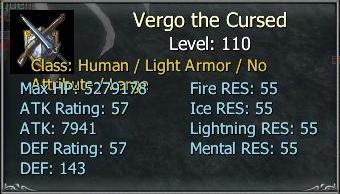
Vergo is easily downed by decently equipped Veterans and Experts.

There will be quite a number of mobs swarming around, but nothing to worry about. If needed, just spam the AOE skills of Outrage Shot and Shotgun Blaster. The only annoying part of this raid is the knock back, which may cause players to lose orientation. Just regroup and keep attacking Vergo, he should go down quickly.

As with all Federigo Raids, collect the loot (especially they key to Vergo's Treasure) and the item inside the treasure chest. The treasure chest here can only drop 1 Constellation Indication. However, there is more loot to be claimed! After the mission is over, proceed to Porto Bello's Deserted Quay and head for the Treasure Chest of the Quay. Using the key looted from Vergo, open this chest. It will usually yield e84 items, non-veteran boots / gloves and even level 100 items.


Don't forget to claim the treasure here

Thursday, 2 September 2010

Federigo Mission : Uraeus

Mission Information
Participation : Solo
Character Lineup : 2x Master Grace - Shotgun Blaster + Flintlock, Master Scout - Arnis + Enhanced Tactics
Requirements : Uraeus Scale (Scale Piece x2, Solvent x100, Emerald x5, White Gold Bar x1), Key to Uraeus Lobby (Family Reputation x300, Pure Ionium x100, Pure Quartz x100, Pure Aidanium x250, Pure Etretanium x250)
Rewards : Elite Schvarlier Armor Recipe (rare), Le Noir Recipe (semi-rare), Elite 92 Armor Recipe, Level 100 items, Constellation Indication (2 maximum, rare), Dragon Heart Recipe (unconfirmed), Le Noir item (unconfirmed).
Frequency : 5 days
Duration : 120 minutes time limit. Average time of 25 minutes to complete mission.
Difficulty : Hard, Highly Equipment Dependent

This mission is highly annoying and frankly takes a fair bit of time, and most often than not disappoints me in loots. But I do it anyway. The best loot that people have gotten (as far as I know) is ESAr, which isn't really that prized at the moment due to two reasons - ABS insertion and the weakness of metal armor vs Occult Magic, Occult Assistance and Madness (the popular stances in the metagame).

This raid is another Wildbeast raid, and I have only attempted to do it without racial weapons once. It's doable, but takes a lot longer. More time spent = more resources spent in buffing and maintaining HP.

The mission is initiated by going to Bahama Peril -> Bahama Underground J8. Among the ingredients needed, only Emerald is rather hard to get. Crap rings are in demand for making Emeralds and Black Oxides, and Emeralds themselves cost 300-800k each in Rembrandt. With the inclusion of a White Gold Bar, the requirements can reach 5m already but the rewards are not as promising as compared to Mission : Griffon.

As the mission starts, I buff principal and clear all Uraeus Eggs except the one nearest where the snake will spawn. I then buff my shooters Shooting Enhancement (duh) and Hound, and may sometimes use a Heart Choco (level 2 Hrin Potion) and a blue lollipop. I make sure my characters are separated from each other to avoid the snake's AOE attack which can cause stun and poison. There's a very high chance of dieing once u get stunned, so try to avoid getting all 3 characters stunned at the same time. Snake will usually go for the highest DPS character, and once a character is stunned, the other shooter MIGHT steal the aggro away.

Crack the Eggs

Be careful of painful debuffs
The mobs can cause poison which reduces your attack and MHP and  the snake's attacks may cause an additional poisoning which further decreases attack and defense. Double poisoned and stun mean trouble.


After downing the snake (for the first time), the egg + snake killing is done three more times to complete the mission. With good rifles, Principal buff should last for 2 snake appearances, so that means having to cast Principal twice only. With less specialized rifles, it will take more time and as i said earlier, longer raid = more resources spent.
Are animals wild beasts?

Federigo Mission : Griffon


Mission Information
Participation : Solo
Character Lineup : 2x Master Grace - Shotgun Blaster + Flintlock, Master Scout - Arnis + Enhanced Tactics
Requirements : Key to Griffon Lobby (Family Reputation x300, Pure Ionium x300, Pure Quartz x300, Pure Aidanium x300, Pure Etretanium x300) , Griffon's Tear (Griffon Egg Shell x6, High Quality Ruby x2, High Quality Sapphire x2, High Quality Emerald x2)
Rewards : Elite 84 items, Level 88 Summoner weapons, Level 100 items, Elite 92 Armor Recipe, Le Noir Recipe, Elite Le Blanc Recipe (rare), Constellation Indication (3 maximum, rare), Dragon Heart Recipe (unconfirmed), Le Noir items (unconfirmed)
Frequency : 7 days
Duration : 120 minutes time limit. Average time of 3 minutes to complete mission.
Difficulty : Moderate, Highly Equipment Dependent

The Griffon mission has the best loots among all instanced missions, hence it can only be done once in seven days. The Elite Le Blanc recipe is not that rare to loot, and is currently selling for 250m or less in Rembrandt. Before this raid, owning an ELB was a lot tougher as "true" Griffon campers usually kept the 30dr for themselves and/or their factions. With the instanced mission, more players are able to create their own 30DR armors.

The mission is initiated by talking to the Pioneer's Warning at D6 of Vegas Javier. Once inside the mission, I buff Principal + Shooting Enhancement on my Grace Bernellis and sometimes Melee Enhancement on my Anton (scout). I then switch Anton to arnis stance and cast hound. I should really replace 1 of the Grace Bernellis with another musketeer for more damage, but I am lazy to train ranged characters.

Mission : Griffon buffs and debuff

I then proceed to H9/H10 of the map, where Griffon will always will be. He usually casts a spell that causes Griffon's dignity, which dramatically reduces my movement speed. Ideally, I should have positioned my characters into a triangle before this happens : Anton at the front distracting the big bird while the two Grace Bernellis whack the bird. The reason I keep them apart is because Griffon can sometimes claw my Gracies to death, and I wouldn't want that to happen to both of them at the same time.

X marks the spot

Big Bird hates Wildbeast Rifles

This raid is simple and straightforward, just buff up, go in, whack it and it's done. It does require higher level equipment to maintain HP and successfully deal damage.

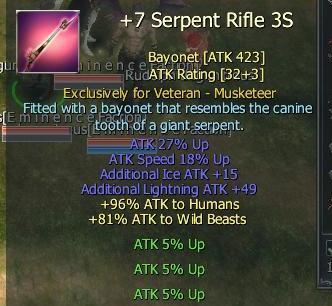
For this raid, I usually always borrow WB rifles from the faction. Without these rifles, the mission will be very hard and will take a longer time. I have tried using non-racials, and it took me more than twice the time because Griffon was pestering me with attacks when he should have been long dead. Here are some of the weapons that have been lent to me for Griffon.


Owner : KingLazarus


Owner : Seitai

I'll grab a screenshot of two more rifles that I get to use for Griffon at some point.

Tuesday, 31 August 2010

Federigo Mission : Rafflesia

Mission Information
Participation : Solo
Character Lineup : Master Grace - Shotgun Blaster, Expert Soho The Wind - Arnis + Enhanced Tactics, Expert Musketeer - Outrage Shot.
Requirements : Key to Rafflesia Lobby (Family Reputation x300, Pure Talt x100, Pure Ionium x500), Seed of Rafflesia (Yellow Rafflesia Leaf x1, Red Rafflesia Leaf x1, Green Rafflesia Leaf x1, Gold Bar x10)
Rewards : Elite 84 items, Level 100 items, Constellation Indication (rare)
Frequency : daily
Duration : 120 minutes time limit. Average time of  5 minutes to complete mission.
Difficulty : Easy

One of the daily solo-able instanced missions  is Rafflesia. For those who spent time leveling in Ustiur Zones, these leaves should be in abundance. Ores and reputation are required for each key.

The Rafflesia mission does not need master characters - expert characters are enough. I actually use a mix of expert characters for this mission believing lower level characters would help increase the drop rate for Constellation Indications. In this mission the key is to obtain max attack speed as all Rafflesia parts have insane regeneration. The usual buffs that I have are Principal + TA buffs + Meditation + Hound. Musk will be on concentration.

Usual buffs for Mission : Rafflesia

 The sequence to finish Rafflesia Mission is Torso > Legs > Egg. Usually, I have my 2 ranged characters attack the torso (since melee cant hit it) while my melee attacks the mobs and keeps the Raflessia Buff up. Don't be mislead by its ridiculous attack value.


The torso will drop items upon death
After dealing with the Torso, the legs are next. They occasionally use a knockback attack which shouldn't be to painful as long as Raflessia Buff is maintained. It can throw characters from one screen to the next and may disorient people. It's best to use shift+click and alt+click to move around and target properly.

The Queen's Legs - get them out of the way quickly
Once the legs are down, all that's left is the egg. It has no attacks as far as I know but it has the greatest regeneration from my observation. Make sure buffs are still ok at this point. If needed, stack Principal and Shooting Enhancement.
Break the egg to get more loots
The egg will drop e84 and level 100 items upon death. The mission reward box also spawns, which has a chance of 1-2 Mega Talts or Constellation Indications.