Showing posts with label Mission. Show all posts

Monday, 29 November 2010

Prison de Joaquin Raid

It was hard.


1st Attempt - 28 November straight after CW
dugunitrous : Romina - STW - Grandice
Cruz : Romina - STW - Nar
Lloydworth : Romina - Scout - Torsche
Pyratic : Musk - Scout - Elementalist
Almarech : Grandice - Scout - Hellena

We tried to follow the guide but upon entering, there was no mini-map (LAME). Mobs were a lot stronger than expected and since it was our first time, we were slightly unprepared. We failed to finish the raid even with Hrins, Triumph Fillers and Status Ampules, though we tried fighting until the end.


2nd Attempt - 29 November
dugunitrous : Trooper - Scout - Reckless
Cruz : Nar - Scout - Grandice
Lloydworth : Grace - Scout - Fighter
Pyratic : Elementalst - Scout - Fighter
Tlabbar : Romina - STW - Elementalist

We learned from our mistakes quickly. Moving as a group and luring + AOE made this attempt a lot easier. We knew where the "ambush spots" were and had Abyss Flares and Spell Hails waiting for them. We had better knowledge on what to expect this time around and it was definitely a lot easier and less painful.

We were all very happy that we completed it despite our "common" armor (no ELN users here!)

As for the drops.. well.. we should do this more often.


Recipe - ELN and Recipe - Prison Series 32AR Weapons
32AR items, HQ Earring, Recipe - Artisan Grade accessories

Gold/Silver Earring, Recipe - Magic Grade accessories
Innocentio Stance Book


note : I spammed screenshot button while the roulette was going.

I highly recommend Fighter/Trooper + Scout + Reckless/Ele for this raid. A lot of the mobs wont be able to hit flying, which makes Reckless very nice to use.

Thursday, 11 November 2010

sGE Renaissance : Raid Galore

With the recent update of sGE to v5.0 aka the Renaissance, new content has been added including Castilla and Bounty Hunter Raids. These raids can be done anytime and have decent returns if you are able to complete them. The roulette system is applied to Castilla and Bounty Hunter Raids, which makes it ok to raid within a large group.

Bounty Hunter Raids can be repeated several times by doing them in the correct order and paying the npc silver bars. My group of 4 usually does veteran and above BHG raids, and we do them in this sequence:
  1. Chaos Requiem 
  2. Bahama (pay npc to be able to redo Chaos Requiem)
  3. Skullic (pay npc to be able to redo Bahama)
  4. 2nd Chaos Requiem
  5. 2nd Bahama (pay npc to be able to redo Chaos Requiem)
  6. 3rd Chaos Requiem
Aside from 12 roulette chances, clearing mobs if time permits enables us to get even more veteran tokens from Jack Spade (the npc inside BHG, dont miss him!). As for now, the only good thing I buy from him are Basement Treasure Box Keys for Torsche Mansion Raid Roulette and Tough Leathers for crafting. Skullic level is 100 to expert 1, Bahama is expert 1 to master 1 and Chaos Requiem is master 1 to master 10. If you plan your teams and training correctly, you can use the same characters for Skullic and Bahama (expert 1) or for Bahama and Chaos Requiem (master 1).

Loots worth mentioning from Chaos Requiem are 32AR items, Elite 96 Armor and Weapon items, Cut-grade Necklaces, Gold/Silver Earrings and Artisan-grade Recipes. Bahama also drops Elite 96 weapons (armor unconfirmed) and Refined Room of the Dead Key from Skullic. ASO boxes, tokens, reputation cards (medal of honour), veteran boots/gloves and level 100 items are common drops from all three.


Castilla Raids is the expansion of the storyline (i think, i dont really read much of it). Castilla can be accessed from the Ticket Seller at Port of Coimbra (where tickets to Bahia and Ustiur are bought). Castilla Mine is free to enter daily. After finishing Castilla Mine, you'll need a few Ancient Relic Piece, Ancient Relics, Ancient Gold Relic Piece and Ancient Gold Relic to progress further.

Medals can be acquired through completion of quests such as killing the bosses, however getting the "quest kill" is not 100%. I myself took 6 tries to complete the first quest and gain my Chaos Steel Ararat Medal. Medals dont really do much (as far as i know) so theyre just for bragging rights / sense of completion. It's possible to power through these quests and finish them quickly but as I see no need to do so, I'm taking my time and only doing Castilla Mine daily if time permits.


Medals are used for...?


Since I've only done Castilla Relic once and not even stepped into Castilla Temple, I'm unable to share possible loots from those raids. So far, Castilla Mine is confirmed to drop DHr, but other than that nothing really amazing.


My personal recommendation for efficient Castilla Raids are musketeers + 1 tanking family/character, preferably with provoke. Squad buffers like Rio, Grace and Elementalists are also welcome if you feel your group lacks strength in weapons. For the more powerful and eager raiders, castilla mine is soloable with 2 musks and a scout or STW equipped with good armors and racial weapons.

Monday, 8 November 2010

Instanced Mission : Arsene Secret Vault *Revisited*

Refer here for previous article.

A minor change to this raid is that the final boss (Celine) now drops the following in addition to the usual Magical Amethyst, Liquefied Gas and Piece of Trump Card:
  • Ancient Star Orb Box x3
  • Ringmaster Arsene's Secret Key (for the regular Arsene Raid)
  • Level 100 item

The ASO box drops in many instanced raids including Torsche Mansion and Bounty Hunters. This helps cover some expense considering the huge amounts of ASO needed for expert stances.

Instanced Mission : Dr. Torsche Mansion Basement *Revisited*

Refer here for previous article.

With the update of sGE to v5.0, some changes have been made to this mission.

  • Torsche Liberation Buff now lasts for 3 minutes instead of 1. - This greatly reduces the amount of Otite Pieces used as well as decreasing the difficulty of the whole raid.
  • There are now 2 Victors instead of 3.
  • The last room now has a roulette chest, which needs a key that can be bought from bounty hunter guild shop using 3 veteran tokens
Despite the reduction of vet chips, pure gold bars and reputation cards, the roulette chest at the end increases the potential loots from this raid. Possible loots include:

  • Level 100 item
  • Medal of Honor B
  • Cut Necklace item
  • Portable ASO box (contains 1000 ASO)
  • Golden Earring item
  • Recipe - Artisan's Belt
  • Recipe - Artisan's Metal Belt
  • Recipe - Elite Le Noir
  • Recipe - Dragon Heart
  • White Gold Bar
  • Elemental Jewel


Here are some screenshots of the roulette chest:


Monday, 6 September 2010

Federigo Mission : Vergo the Cursed

Mission Information
Participation : Solo
Character Lineup : Master Grace - Shotgun Blaster, Expert Soho The Wind - Arnis + Enhanced Tactics, Expert Musketeer - Outrage Shot.
Requirements : Platinum Hammer (Silver Hammer x1, White Gold Bar x1), Vergo the Cursed Lobby Key (Family Reputation x300, Pure Talt x500)
Rewards : Elite 84 items, Level 100 items, 1 Constellation Indication (rare)
Frequency : daily
Duration : 120 minutes time limit. Average time of  5 minutes to complete mission.
Difficulty : Easy

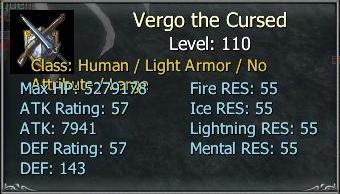
A fairly easy solo-able instanced mission is Vergo the Cursed. It is the easiest of all Federigo Raids and can be done daily. The simplicity of the raid and its low level of difficulty has pushed the price of Silver Hammers in Rembrandt server since most families with decent equips and veteran or expert characters can complete the raid.

For this raid, I use the same "shooter" team that I complete Mission : Rafflesia with. Casting Principal and Hound once are usually enough to kill Vergo.


Usual buffs for Mission : Vergo

To start the mission, proceed to I4 of Porto Bello's Desolated Cliff. Surrender the platinum hammer to the tombstone and proceed to the gate that appears and use the corresponding key. Once inside, buff up and proceed to G/H 5 where Vergo will be waiting.

Vergo is in the middle of the map.

He is susceptible to range attackers and daggers, which should prove no problem to team. Though he is human, there is no need for human bane weapons. This mission can be accomplished with trump weapons.

Vergo is easily downed by decently equipped Veterans and Experts.

There will be quite a number of mobs swarming around, but nothing to worry about. If needed, just spam the AOE skills of Outrage Shot and Shotgun Blaster. The only annoying part of this raid is the knock back, which may cause players to lose orientation. Just regroup and keep attacking Vergo, he should go down quickly.

As with all Federigo Raids, collect the loot (especially they key to Vergo's Treasure) and the item inside the treasure chest. The treasure chest here can only drop 1 Constellation Indication. However, there is more loot to be claimed! After the mission is over, proceed to Porto Bello's Deserted Quay and head for the Treasure Chest of the Quay. Using the key looted from Vergo, open this chest. It will usually yield e84 items, non-veteran boots / gloves and even level 100 items.


Don't forget to claim the treasure here

Thursday, 2 September 2010

Federigo Mission : Uraeus

Mission Information
Participation : Solo
Character Lineup : 2x Master Grace - Shotgun Blaster + Flintlock, Master Scout - Arnis + Enhanced Tactics
Requirements : Uraeus Scale (Scale Piece x2, Solvent x100, Emerald x5, White Gold Bar x1), Key to Uraeus Lobby (Family Reputation x300, Pure Ionium x100, Pure Quartz x100, Pure Aidanium x250, Pure Etretanium x250)
Rewards : Elite Schvarlier Armor Recipe (rare), Le Noir Recipe (semi-rare), Elite 92 Armor Recipe, Level 100 items, Constellation Indication (2 maximum, rare), Dragon Heart Recipe (unconfirmed), Le Noir item (unconfirmed).
Frequency : 5 days
Duration : 120 minutes time limit. Average time of 25 minutes to complete mission.
Difficulty : Hard, Highly Equipment Dependent

This mission is highly annoying and frankly takes a fair bit of time, and most often than not disappoints me in loots. But I do it anyway. The best loot that people have gotten (as far as I know) is ESAr, which isn't really that prized at the moment due to two reasons - ABS insertion and the weakness of metal armor vs Occult Magic, Occult Assistance and Madness (the popular stances in the metagame).

This raid is another Wildbeast raid, and I have only attempted to do it without racial weapons once. It's doable, but takes a lot longer. More time spent = more resources spent in buffing and maintaining HP.

The mission is initiated by going to Bahama Peril -> Bahama Underground J8. Among the ingredients needed, only Emerald is rather hard to get. Crap rings are in demand for making Emeralds and Black Oxides, and Emeralds themselves cost 300-800k each in Rembrandt. With the inclusion of a White Gold Bar, the requirements can reach 5m already but the rewards are not as promising as compared to Mission : Griffon.

As the mission starts, I buff principal and clear all Uraeus Eggs except the one nearest where the snake will spawn. I then buff my shooters Shooting Enhancement (duh) and Hound, and may sometimes use a Heart Choco (level 2 Hrin Potion) and a blue lollipop. I make sure my characters are separated from each other to avoid the snake's AOE attack which can cause stun and poison. There's a very high chance of dieing once u get stunned, so try to avoid getting all 3 characters stunned at the same time. Snake will usually go for the highest DPS character, and once a character is stunned, the other shooter MIGHT steal the aggro away.

Crack the Eggs

Be careful of painful debuffs
The mobs can cause poison which reduces your attack and MHP and  the snake's attacks may cause an additional poisoning which further decreases attack and defense. Double poisoned and stun mean trouble.


After downing the snake (for the first time), the egg + snake killing is done three more times to complete the mission. With good rifles, Principal buff should last for 2 snake appearances, so that means having to cast Principal twice only. With less specialized rifles, it will take more time and as i said earlier, longer raid = more resources spent.
Are animals wild beasts?

Federigo Mission : Griffon


Mission Information
Participation : Solo
Character Lineup : 2x Master Grace - Shotgun Blaster + Flintlock, Master Scout - Arnis + Enhanced Tactics
Requirements : Key to Griffon Lobby (Family Reputation x300, Pure Ionium x300, Pure Quartz x300, Pure Aidanium x300, Pure Etretanium x300) , Griffon's Tear (Griffon Egg Shell x6, High Quality Ruby x2, High Quality Sapphire x2, High Quality Emerald x2)
Rewards : Elite 84 items, Level 88 Summoner weapons, Level 100 items, Elite 92 Armor Recipe, Le Noir Recipe, Elite Le Blanc Recipe (rare), Constellation Indication (3 maximum, rare), Dragon Heart Recipe (unconfirmed), Le Noir items (unconfirmed)
Frequency : 7 days
Duration : 120 minutes time limit. Average time of 3 minutes to complete mission.
Difficulty : Moderate, Highly Equipment Dependent

The Griffon mission has the best loots among all instanced missions, hence it can only be done once in seven days. The Elite Le Blanc recipe is not that rare to loot, and is currently selling for 250m or less in Rembrandt. Before this raid, owning an ELB was a lot tougher as "true" Griffon campers usually kept the 30dr for themselves and/or their factions. With the instanced mission, more players are able to create their own 30DR armors.

The mission is initiated by talking to the Pioneer's Warning at D6 of Vegas Javier. Once inside the mission, I buff Principal + Shooting Enhancement on my Grace Bernellis and sometimes Melee Enhancement on my Anton (scout). I then switch Anton to arnis stance and cast hound. I should really replace 1 of the Grace Bernellis with another musketeer for more damage, but I am lazy to train ranged characters.

Mission : Griffon buffs and debuff

I then proceed to H9/H10 of the map, where Griffon will always will be. He usually casts a spell that causes Griffon's dignity, which dramatically reduces my movement speed. Ideally, I should have positioned my characters into a triangle before this happens : Anton at the front distracting the big bird while the two Grace Bernellis whack the bird. The reason I keep them apart is because Griffon can sometimes claw my Gracies to death, and I wouldn't want that to happen to both of them at the same time.

X marks the spot

Big Bird hates Wildbeast Rifles

This raid is simple and straightforward, just buff up, go in, whack it and it's done. It does require higher level equipment to maintain HP and successfully deal damage.

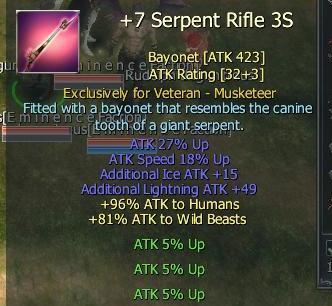
For this raid, I usually always borrow WB rifles from the faction. Without these rifles, the mission will be very hard and will take a longer time. I have tried using non-racials, and it took me more than twice the time because Griffon was pestering me with attacks when he should have been long dead. Here are some of the weapons that have been lent to me for Griffon.


Owner : KingLazarus


Owner : Seitai

I'll grab a screenshot of two more rifles that I get to use for Griffon at some point.

1st Day of September

It's hard to keep track of expenses and earnings. I usually just raid all the time, sell if it's in demand or trade it to something I need if the owner agrees, and buy items when I really need them.

Prices are rapidly fluctuating, I'm seeing a drop in veteran chips yet an increase in Level 100 chip packs, which doesn't add up. My theory is that since chip packs are around 13m each, then each level 100 chip should be 1.3m, making each vet chip 3.9m. I checked the market manager only to find that vet chips were being sold for as low as 3.1m. As for magical amethysts and liquefied gas, it seems that more and more people are able to do Arsene Secret Vault and the continuing supply from abs continue to push their values lower and lower. Two weeks ago, it was nice to sell MA/LG for 2.5m each. Now it's hard to sell them for 2m each. Maybe all the top tier players have gathered enough for WoAs, HoAs and Garim Belts.

Earning is getting difficult, but since I am not making or intending to buy any new equipment, I guess I don't feel it as much. GP items have reached a plateau in prices and may even decrease soon. At the moment, I only need growth stones (combat & training manuals,veteran & expert scrolls) and raiding items such as Silver/Platinum Hammers and Griffon eggs/tears.

Below is an example of a good day in earnings. Minor items such as Medal of Honour, Pure Gold Bars and below level 100 chips are not included.

Premium Treasure Chest
3 player game - 2 wins - 21 Triumph Fillers ~ 35.7

Mission : Raflessia
+6 Elite Staff of Simurgh ~ 35m
+6 Grim-Shout ~18m
Symbol of Aries ~ 18m

Mission : Torsche Mansion
7 Veteran chips ~ 21m

Mission : Arsene Vault
2 Magical Amethyst ~ 4m
3 Liquefied Gas ~ 6m
1 Piece of Trump ~5m

Mission : Uraeus
+5 Gigantic Poleaxe ~ 5.5m
Recipe - Elite Dragon Coat ~ 250k

Mission : Griffon
Recipe - Elite Dragon Coat ~ 250k
Reciple - Le Noir Wizard ~ 1m
Symbol of Scorpio ~ 38m

Today's estimated earnings : 187.7m

There is no Mission : Vergo because I am out of Silver/Platinum Hammers and refuse to buy the ones in Market Manager. There were more items looted but for level 100 items, I automatically make them +5/6 and for e84/88 items I make them into +6. From what you can see here, a lot of them broke *_*

Tuesday, 31 August 2010

Federigo Mission : Rafflesia

Mission Information
Participation : Solo
Character Lineup : Master Grace - Shotgun Blaster, Expert Soho The Wind - Arnis + Enhanced Tactics, Expert Musketeer - Outrage Shot.
Requirements : Key to Rafflesia Lobby (Family Reputation x300, Pure Talt x100, Pure Ionium x500), Seed of Rafflesia (Yellow Rafflesia Leaf x1, Red Rafflesia Leaf x1, Green Rafflesia Leaf x1, Gold Bar x10)
Rewards : Elite 84 items, Level 100 items, Constellation Indication (rare)
Frequency : daily
Duration : 120 minutes time limit. Average time of  5 minutes to complete mission.
Difficulty : Easy

One of the daily solo-able instanced missions  is Rafflesia. For those who spent time leveling in Ustiur Zones, these leaves should be in abundance. Ores and reputation are required for each key.

The Rafflesia mission does not need master characters - expert characters are enough. I actually use a mix of expert characters for this mission believing lower level characters would help increase the drop rate for Constellation Indications. In this mission the key is to obtain max attack speed as all Rafflesia parts have insane regeneration. The usual buffs that I have are Principal + TA buffs + Meditation + Hound. Musk will be on concentration.

Usual buffs for Mission : Rafflesia

 The sequence to finish Rafflesia Mission is Torso > Legs > Egg. Usually, I have my 2 ranged characters attack the torso (since melee cant hit it) while my melee attacks the mobs and keeps the Raflessia Buff up. Don't be mislead by its ridiculous attack value.


The torso will drop items upon death
After dealing with the Torso, the legs are next. They occasionally use a knockback attack which shouldn't be to painful as long as Raflessia Buff is maintained. It can throw characters from one screen to the next and may disorient people. It's best to use shift+click and alt+click to move around and target properly.

The Queen's Legs - get them out of the way quickly
Once the legs are down, all that's left is the egg. It has no attacks as far as I know but it has the greatest regeneration from my observation. Make sure buffs are still ok at this point. If needed, stack Principal and Shooting Enhancement.
Break the egg to get more loots
The egg will drop e84 and level 100 items upon death. The mission reward box also spawns, which has a chance of 1-2 Mega Talts or Constellation Indications.

Instanced Mission : Arsene Secret Vault

Mission Information
Participation : 2 families (squad up with Cruz)
Character Lineup : Romina - STW - Grandice (mine), Grandice - Scout - Hellena (Cruz)
Requirements : 500 reputation points
Rewards : Magical Amethyst, Liquefied Gas, Piece of Trump Card, Medal of Honour, Buckle, Trump Armor recipe (rare), ELN recipe (very rare)
Frequency : daily
Duration : 30 minutes time limit. Average time of 12 minutes to complete mission.
Difficulty : Moderate

The Arsene Secret Vault mission has been available for quite some time now. The complete guide is detailed in BookOfWind. Being able to use three characters allows us to make full use of Enhanced Tactics Buffs, which make the mission a lot easier. I (usually) play the role of boss attacker whilst Cruz plays (with) Hellena. Loot rules are set to acquire by turn to equally split all loots, including Medal of Honor cards.

As the mission starts, we buff up (Principal + TA buffs + meditation) and pay the 500 reputation points to enter the 2nd room. I activate Bless and cast Refresh Mind my Romina before entering the 2nd room.Cruz runs around the area to avoid the mobs, but I assume his master Hellena will have no problem taking a few hits every now and then with the current armor she is equipped with (no need and useless to kill the mobs due to infinite spawn). In the meantime, I rush in to the boss to room do deal with to deal with Celine and an additional boss. As soon as my first Bless wears off, I activate it again (no need to wait for cooldown due to Refresh Mind) I want to keep my +1AR up and its additional benefits to finish the mission as quickly as possible. This procedure goes on as Prost, Emily and Mario are defeated.


Hellena's Armor : sturdy

 Once Mario is defeated, the cooldown for bless should be almost finished. Same buff sequence as the first room is done, including bless + refresh mind. The critical and hardest part of the raid is the last room. Upon reaching the last room, I rush to Celine to deal enough damage to her until Prost is summoned. I then focus on finishing Prost as soon as i can. This is because once Prost is dealt with, the mobs will disappear and Cruz can relax. Emily and Mario do not pose much of a threat. After dealing with Mario for the 2nd time, all that's left to do is kill Celine. During this time she likes to use attacks that inflict Armor Crasher, so Hellena is best kept away to a safe location. Defeating Celine will yield more loots, and the chance of Trump Armor Recipe and even Elite Le Noir Recipe.
Reduce Celine HP to make Frost appear - and kill frost ASAP!

Be careful of Armor Crasher

Instanced Mission : Dr. Torsche Mansion Basement

Mission Information Participation : 2 families (squad up with Cruz)
Character Lineup : Romina - STW - Grandice (me), Grandice - Scout - Grandice (Cruz)
Requirements : 100 Otite Pieces on entry, 200+ Otite Pieces within the mission
Rewards : 15 Veteran chips, Pure Gold Bars, Medal of Honour A, Sunstones, Veteran Boots and Gloves (rare)
Frequency : daily
Duration : 1 hour time limit. Average time of 32 minutes to accomplish.
Difficulty : Hard

The Dr Torsche Mansion Basement was unlocked along with the rest of the expert stances promised in v4.5. The complete guide can be seen here. My raid partner Cruz and I have been doing this mission since it was unlocked, and have so far only failed once, due to massive lag + disconnection. We use the following characters: Romina-Equites, SohoTheWind, Grandice, wearing Le Noir, Elite Le Blanc and Elite Schvarlier Armors.

Otite pieces are essential to have any chance of completing this raid. A good stock is to have about 500 before going in. The debuff lasts for 3 minutes and disables all usage of skills.
Pay the crystal 10 otite pieces or suffer even more.

Debuff: Painful.


Below is a description on how we tackle the raid on a daily basis.
Mission Start - wait for Dr Torsche dialogue. He will give a number that is a multiple of 7. Divide this number by 7 and that is the number to unlock the 1st room. We also start buffing ourselves at this stage. Principal, TA buffs, Meditation. Hrin is essential, and at this point, Blue Lollipop or Rainbow Lollipop can be used.

This means to solve room 1, the clicked rock must say #5.


Room 1 - Loyd


Room 1 - Walter. Not much difficulty here. Despite wearing metal against their fire-based attacks, this room is quickly dealt with


Room 2 - Helena


Room 2 - Hellena. Still warming up. Hellena's attacks are physical. Not a problem against our selected team.


Room 3 - Sasha
Room 3 - Sasha. Things start getting interesting. From room 2, we would have to pass by room 1 again, often dragging mobs along the way. Upon reaching room 3, the Torsche Buff should be renewed before engaging the mobs. Depending on the pace, buffs should be running out soon. Sasha's lightning-based attack always proves to be painful against Grandice due to her metal armor + low immunity.


Room 4 - Lloyd


 Room 4 - Lloyd. Room to breathe. Back to physical attacks. Their ranged attacks are somewhat annoying since our melee team cant see well where the shots are coming from. After completing this room, full rebuff is usually done to prepare for the next two rooms which are the most difficult.


Room 5 - Pyg

Room 5 - Pyg. Mind Resistance Potion is essential to lessen the pain of their mental-based damage. Blue Lollipop should be gone by now, and a Rainbow Lollipop is consumed.Though these mobs have a skill that can cause knock-back, they do not use it that often. Their normal attack is melee which doesn't make it too hard to the team.


Room 6 - Wight

Room 6 - Wight. The decider room as Cruz and I call it. Make it or Break it. At some point, I used alot of Soul Crystals in this room. Their attack is very strong and very quick, and they like to make use of their knock-back spell. With some persistence, determination, focus and luck, this room is doable. Once this room is completed, we consider the mission successful already.


Room 7 - Greg


Room 7 - Greg. Apparently this mob can inflict Armor Crasher. Luckily, my team has never been on its receiving end. Romina and Grandice have enough skills to spam to keep these melee creatures in control, and once again, this room is easily cleared.


Onwards to the loots  Boss!


Boss Rooms. In each boss room, there is a small chance of 10 Demonic Treasure Zealots spawning. Each one drops a sunstone. They don't run fast and are easy to kill. Feso compensation maybe for all the Ancient Star Orbs used within the mission. The final boss is Victor with l33t1 attack. Maybe it's an Easter egg planted by IAH.

Boss Room - Demonic Treasure Zealot

Boss Room - Victor
The boss is seldom a problem even if it summons a few extra mobs from the earlier rooms to help it out. After killing 1 Victor, a warp opens to the room of the next Victor. Defeat all 3 to complete the mission.

If Victor summons reinforcements, be careful.

As with most raids with Cruz, our looting system is always set to Acquire by Turn. At the end of the mission, we check how many Vet chips we looted each and split it at 8-7. We take turns on who gets the extra vet chip and occasionally give it to the one who used (the most number of) Soul Crystals. On good runs, we wont have to use any SC at all. On bad runs, we use 5 or more SC combined.